Cart
There are no more items in your cart
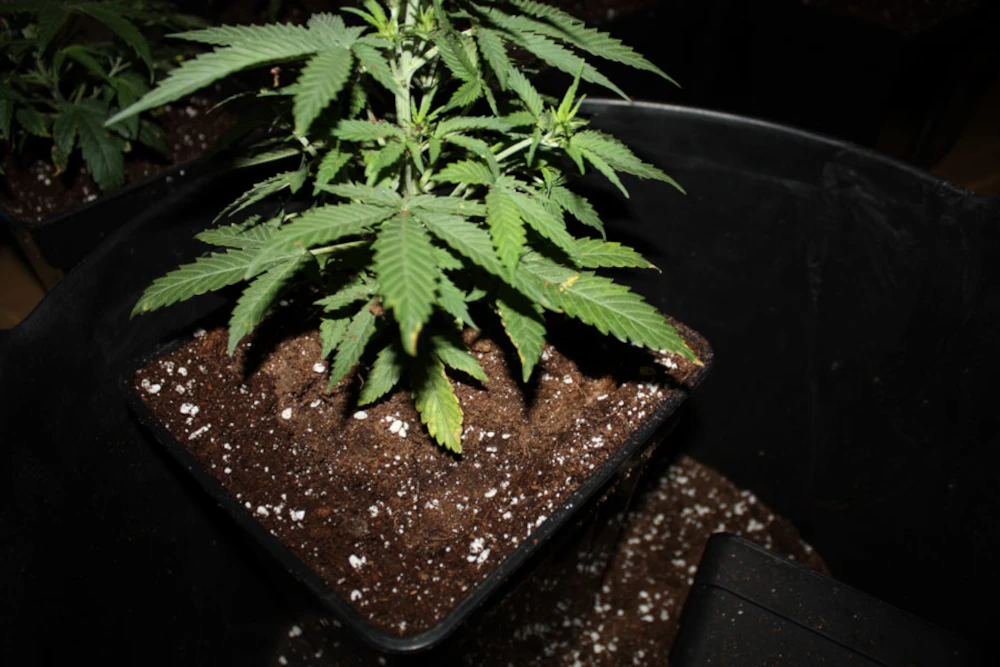
Everything You Need to Know About Transplanting Your Cannabis Plants
Knowing the right time to transplant cannabis plants is key to keeping them healthy and encouraging better growth, which ultimately leads to a higher yield. But it’s crucial to do it properly to avoid stressing your plants, which could delay development or reduce your final harvest.
To help you get it right, we’ve put together all the essential information so you can transplant cannabis plants at the right time and with as few mistakes as possible, leading to strong, healthy plants. Ready? Let’s dive in!
What Does Transplanting Mean?
It’s simple: transplanting means moving your cannabis plants, with their roots and root balls intact, from one container to another, usually a larger one.
Cannabis plant development is mainly determined by the strain’s genetics, along with several other factors, such as the growing environment and external agents like climate, substrate, type of nutrients, and whether the plants are grown indoors or outdoors. Root development isn’t just an underground detail. It has a direct influence on how the plant grows. A wide but shallow root system encourages horizontal, bushy growth, while deep, narrow roots will push the cannabis plant to grow tall and slender, with fewer lateral branches.
That’s why choosing the right pot (or growing area if outdoors) becomes a crucial decision that greatly influences the growth direction and overall structure of your cannabis plants.
Why Is It Important to Transplant Cannabis Plants?
Whether growing indoors or outdoors, the roots need a balanced environment with darkness, moisture, oxygen, and space to thrive. Cannabis roots tend to spread out toward the sides and bottom of the pot. Starting a freshly germinated seed or small cutting in a large pot can lead to uneven development, as the roots are more likely to grow toward the edges and bottom, leaving some areas of the soil unused.
When growing cannabis, transplanting offers a key solution, allowing the roots to expand more evenly through the substrate and improving nutrient uptake.
However, starting out in a large pot also has its drawbacks. The substrate holds more water for longer, increasing the risk of overwatering. This can cause issues, making it even more important to choose a pot size that matches the plant’s needs and the grow environment to support healthy, balanced development. On the flip side, using a pot that’s too small for the plant will lead to root stress and quickly deplete the available nutrients in the substrate.
Does Pot Size Affect Cannabis Growth?
Yes, pot size can have a significant impact on the growth of cannabis plants. Here are a few examples:
- Larger pots allow for greater root development, which can result in a more robust and healthier root system.
- A bigger pot gives the plant more room to grow both vertically and laterally, allowing it to reach its full potential.
- A greater volume of substrate in larger pots means higher nutrient retention, which can improve the plant’s nutrient uptake.
- Larger pots tend to retain moisture for longer periods, providing better resistance to water stress and reducing how often you need to water.
- They help prevent root tangling and growth restriction, avoiding root-bound issues.
That said, when you transplant cannabis plants, it’s essential to match the pot size with other factors, such as plant size, environmental conditions, and the cannabis plant’s life cycle. A pot that’s too large for a small plant, as we mentioned earlier, may hold excess moisture and make it harder to manage nutrient uptake. Or even worse, it could create a perfect breeding ground for harmful fungi that may eventually wilt your plant. On the other hand, a pot that’s too small will stunt the plant’s proper development.
It is very important to make sure that the choice of pot always matches the specific needs of each stage of the plant’s life cycle.
Transplanting Autoflowering Cannabis Plants
For novice growers, we recommend not transplanting autoflowering strains unless you have a certain level of skill or feel confident in your technique. In the case of autoflowering plants, it’s best to place them directly into their final pot to avoid any stress that could affect the plant’s growth and development, especially if the transplant is not done properly or at the ideal time. However, this approach requires careful watering when the plant is still small to avoid keeping the substrate too wet for too long.
If you still decide to transplant your autoflowering plants, here you can find all the key information you’ll need to make the process easier and ensure a successful result.
As you probably know, autoflowering seeds, also known as automatic or auto seeds, produce cannabis plants that flower regardless of the photoperiod they are subjected to. Their flowering stage is triggered by age or the plant’s life cycle, usually around the third or fourth week of life.
One of the most common questions among autoflowering growers is the ideal pot size for their plants. Since these plants don’t develop as extensive a root system as photoperiod-dependent strains (which can spend several months in the vegetative stage) they don’t need large pots early on.
Ideally, after germination, seedlings should be planted in small pots (between 300 ml and 1 liter). This helps prevent the substrate from retaining too much moisture and ensures good oxygenation in the root zone during the first weeks of growth. Otherwise, root development could be compromised, leading to nutrient deficiencies or even fungal attacks, which can be fatal.
It’s crucial to remember that because given the fact that autoflowering plants develop so quickly, any stress during the first few weeks can impact their growth and final yield.
When your autoflowering plants are about 12 to 17 days old, it’s generally the right time to transplant them into their final pot, which should be between 5 and 10 liters, up to a maximum of 20 liters. Another way to decide when to transplant is by checking if the plant has grown to about three times the size of its current pot.
The transplant should be done with extreme care and delicacy, without damaging or tearing the cannabis plant’s roots, and always removing the entire root ball intact. Use a substrate with ideal characteristics, similar in structure and pH to the previous one, to minimize stress and ensure optimal vegetative and root development. If you want to take advantage of the opportunity, this is the perfect time to add beneficial bacteria and fungi (such as mycorrhizae or Trichoderma) to the root ball. These microbes generally support and protect the roots as they grow.
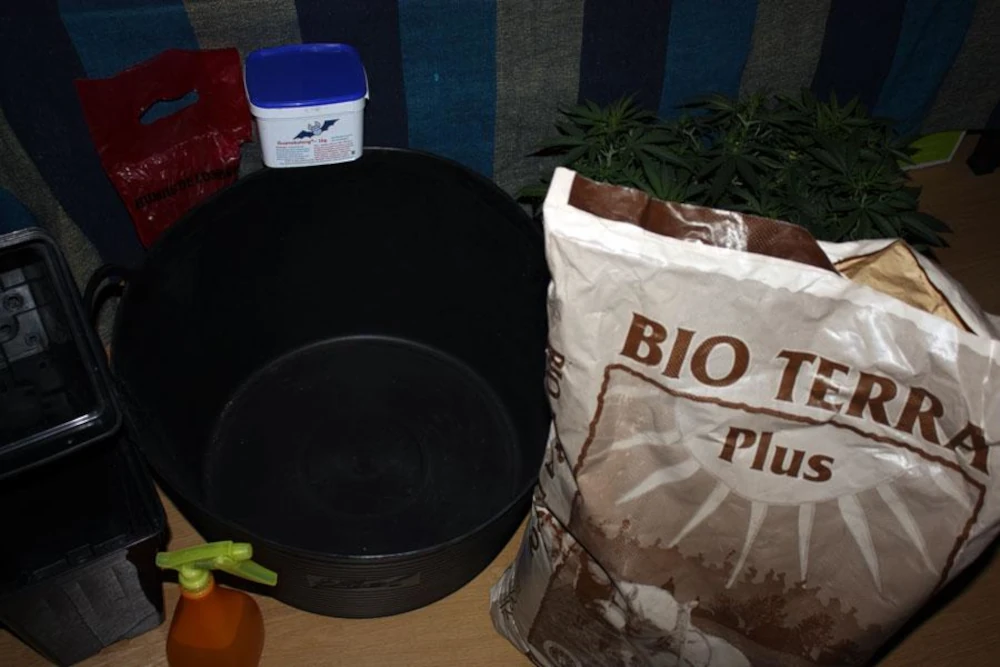
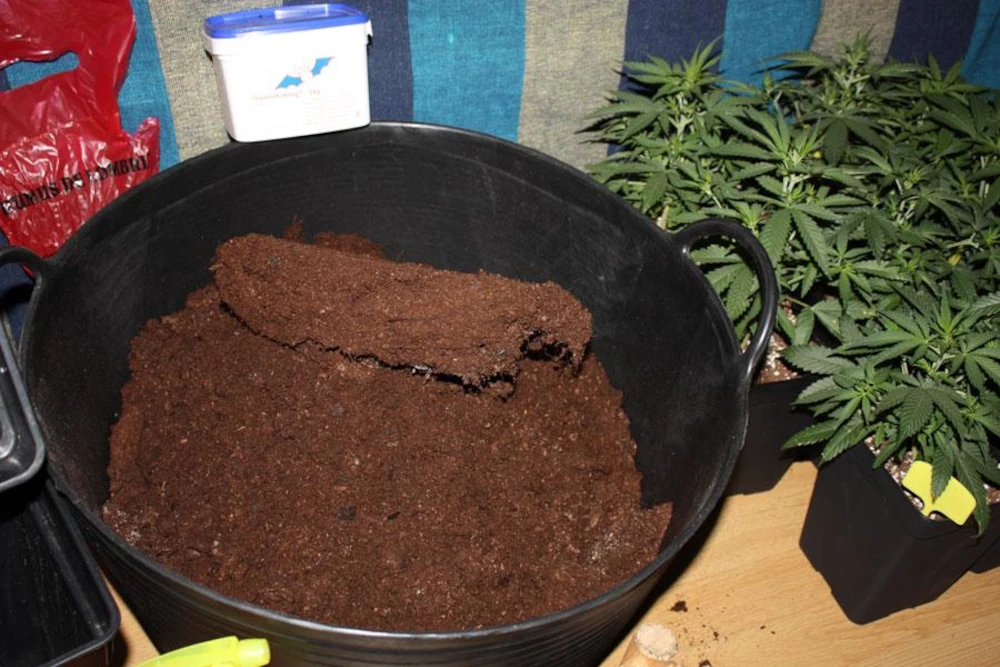
What Do We Need for Transplanting?
To transplant cannabis plants, you’ll need the following materials:
- Pots: You’ll need the appropriate pots for the transplant. It is very important to thoroughly disinfect the pots before use to prevent infections or root diseases.
- Substrate: Make sure you have enough substrate for the new pot. We recommend using a light, well-aerated substrate that doesn’t retain excess moisture. To improve drainage, you can place disinfected river stones or a layer of expanded clay at the bottom of the pot.
- Gloves: Wearing latex gloves will help keep things clean and reduce the risk of contaminating the roots. It’s also more hygienic for the grower.
- Root Stimulator (Optional): It helps encourage root development and supports the plant in overcoming transplant stress.
- Mycorrhizae and Trichoderma (Optional): During the transplant, you can add these beneficial fungi and bacteria to the root ball. They promote root development and provide protection against pathogens.
When Should We Transplant Photoperiod-Dependent Cannabis Plants?
As the name suggests, photoperiod-dependent cannabis seeds rely on the light cycle to begin their flowering phase. Outdoors, the flowering phase is triggered by shorter days and longer nights. Indoors, flowering is initiated and maintained by providing a 12-hour light / 12-hour dark cycle until harvest.
The F1 Fast Version® strains (a concept we pioneered) are 100% photoperiod-dependent plants with an ultra-fast flowering time, reaching harvest 1 to 2 weeks earlier than the original version. These strains are an excellent choice for growers in humid or rainy climates, where fungal issues are more likely to affect your cannabis plants.
With these special cannabis strains, transplanting can be done the same way as with other photoperiod-dependent plants. Also, as with all photoperiod-dependent strains, it’s not recommended to transplant after the flowering stage has started.
Transplanting in Outdoor Grows
Spring marks the beginning of the natural season for outdoor cannabis growing. When deciding the best time to germinate your photoperiod-dependent seeds, there’s one key principle to keep in mind: the earlier you plant them, the more time your plant will have to grow. The best months to germinate Sweet Seeds® photoperiod-dependent seeds for growing in pots outdoors are April, May, and June. So, if you want to end up with the biggest possible plants, it is advisable to start as early as possible, in April. If you prefer smaller and more discreet plants, it’s ideal to start in the last days of spring, or even in the first days of summer.
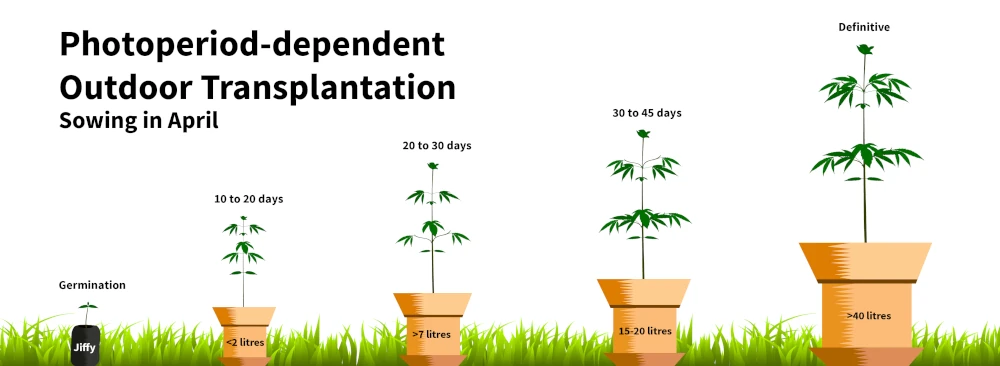
Here’s a quick summary to help guide your transplant schedule for outdoor cannabis growing:
- First transplant: Once the seed has germinated in the jiffy and the cotyledons have appeared, move it into a pot of at least 2 liters. Wait 10 to 20 days before performing the second transplant.
- Second transplant: To determine the right moment for the next transplant, observe the height of the plant compared to the pot. If the plant is two to three times taller than the pot, the roots will likely have filled most of the substrate, and it’s time to move the plant into a larger pot. Another way to tell if the time for the second transplant has arrived, is by checking whether the root system has completely colonized the pot.
- Third transplant: When the plant has grown taller than the pot, it’s time to transplant into a container of at least 7 liters. Let it stay in this pot for 2 to 3 weeks, or until the plant’s height once again exceeds that of the pot. Make sure the roots have colonized the substrate before moving on to the next pot.
- Fourth transplant: When the time is right, move the plant into its final pot, making sure that it hasn’t started flowering yet. You can use containers of 40 liters or even larger.
Keep in mind that when you transplant cannabis plants, the larger the final container, the bigger and taller the plant can become, as long as other factors such as substrate quality, fertilization, and the total amount of light are also optimized.
Transplanting in Indoor Grows:
In indoor grows, you have full control over when to switch your plants to the flowering phase. You can choose to perform two or three transplants for your cannabis plants. Below is a guide on how to handle transplanting in indoor setups:
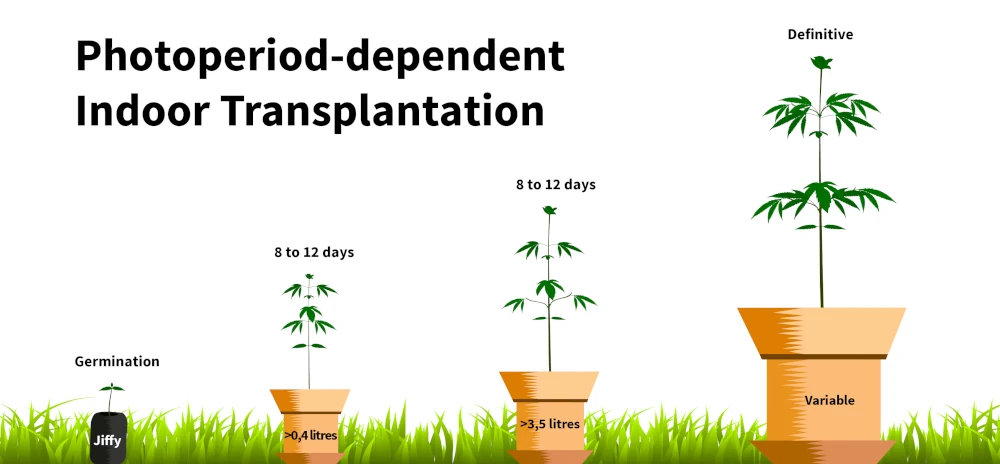
- First transplant: Once the seed has germinated in your chosen medium (rockwool, jiffy, etc.), move it into a pot of at least 0.4 liters. Let it stay in this new container for 8 to 12 days.
- Second transplant: After those 8 to 12 days, transplant the plant into a pot with a minimum capacity of 3.5 liters. Let it stay here for another 8 to 12 days, or until the substrate has been fully colonized by roots.
At this point, you may choose to perform only two transplants. If so, the second transplant should be into the final pot. In this case, it’s essential to take into account the pot’s capacity, the number of plants you’re growing, the lighting, and the type of strain you’re working with (autoflowering or photoperiod-dependent).
- Third transplant: For this third transplant, move the plant into its final container. Once again, consider the pot size, number of plants, lighting setup, and whether you’re growing autoflowering or photoperiod-dependent strains. Ideally, this should be done just before switching the light cycle to trigger flowering. That way, the nutrients in the new substrate will support the plant, reducing the need for heavy fertilization at the start of flowering.
How to Transplant Cannabis Plants
Once you’ve gathered and disinfected all the necessary materials, it’s time to prepare the new pot where you’ll be transplanting your cannabis plant. Fill it about halfway with high-quality substrate, gently pressing it down to create a stable base for the roots.
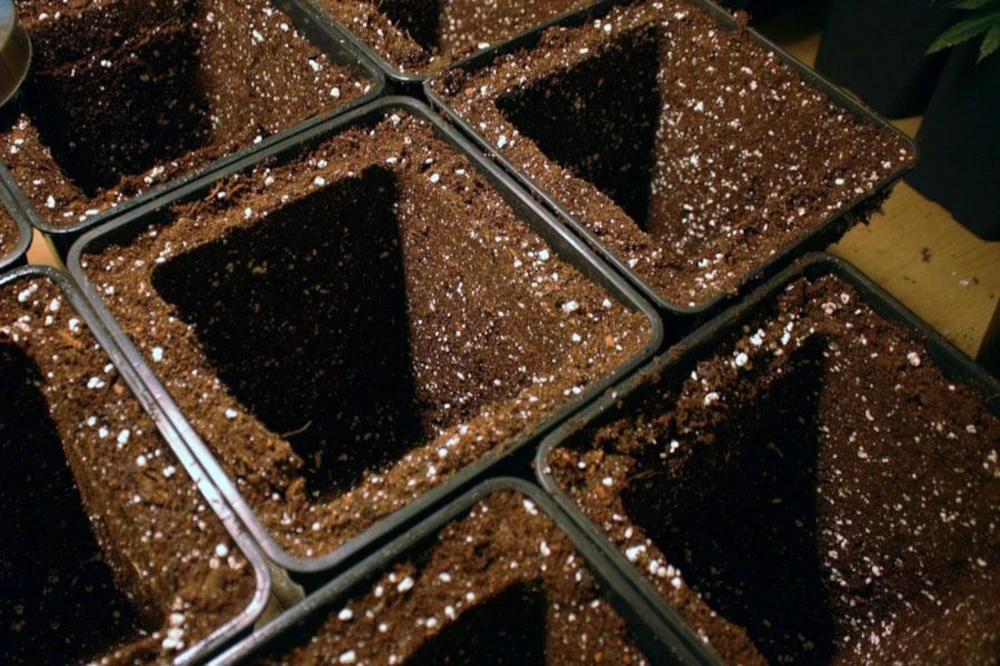
To adequately transplant cannabis plants, a handy trick is to place a small pot (the same size as the one your plant is currently in) inside the larger pot and then fill the larger pot completely with substrate in the sides and all the way to the bottom of the pot. Then, remove the small pot to reveal a perfectly sized hole. When you take your plant out of its original pot, you can place it directly into that hole, which fits the root ball exactly.
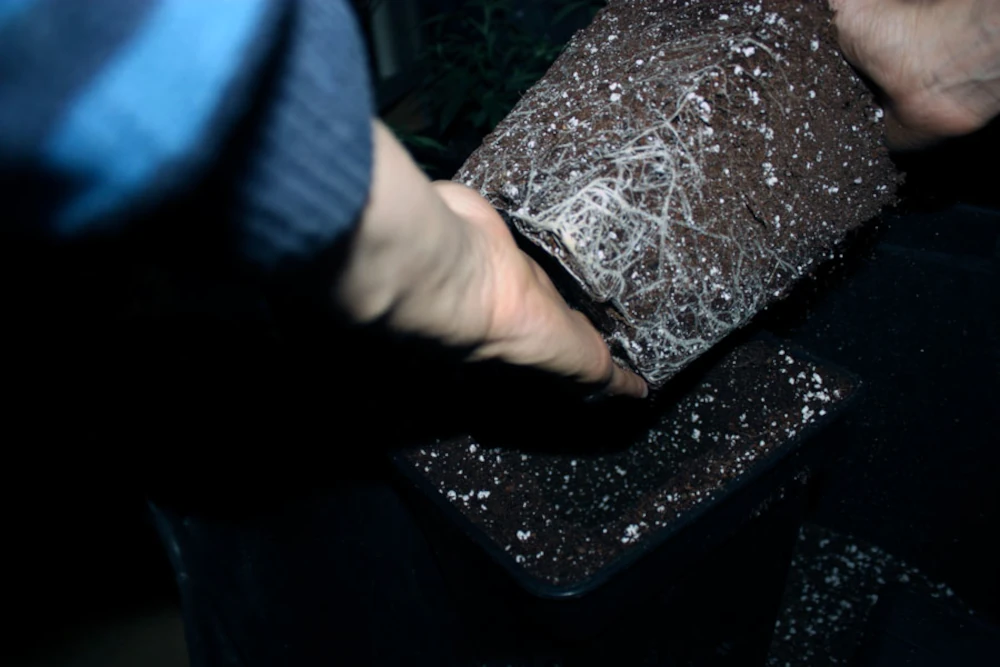
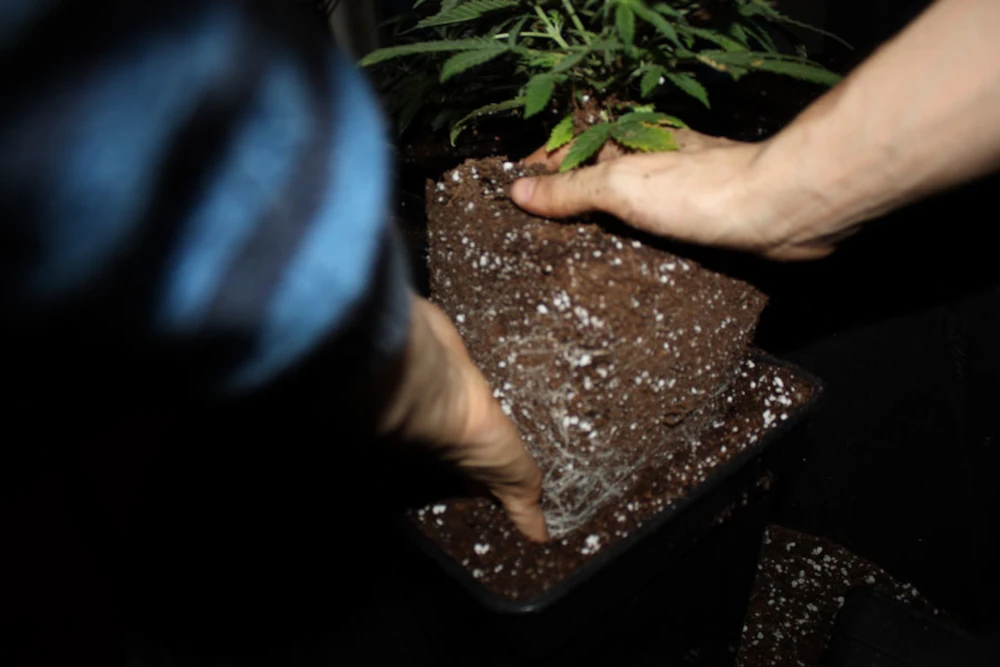
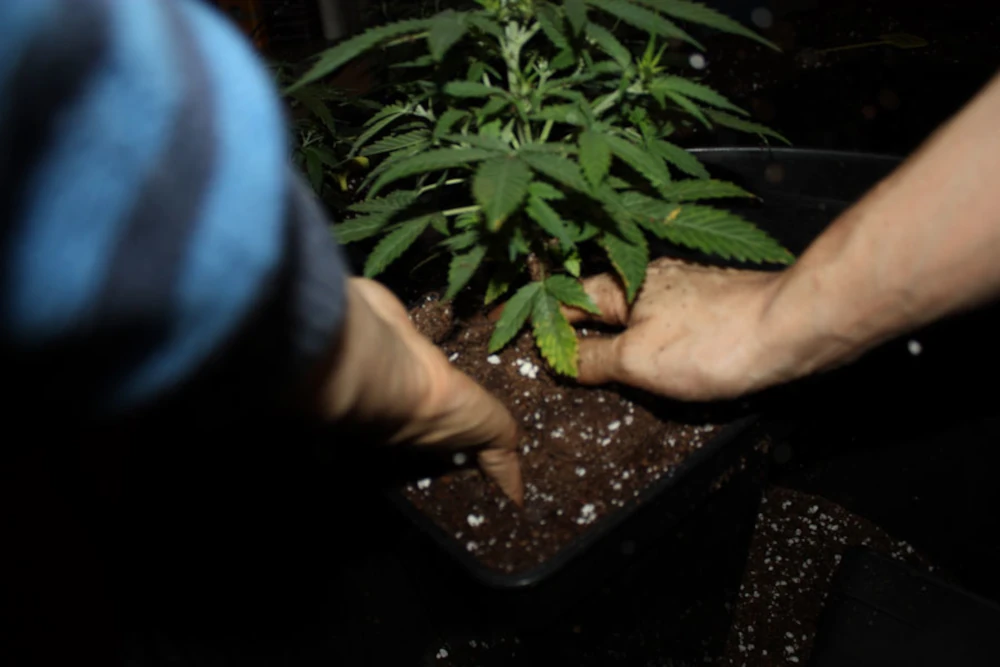
Now, carefully and firmly hold the plant by the base of the stem with one hand, then tilt the pot to gently remove the plant along with its root ball, formed by the substrate and root system. Gently place the plant upright in its new container and fill in the space between the root ball and the edges of the new pot with substrate until it’s covered with at least 2 centimeters of substrate. Now all that’s left is to wait while the plant adapts to its new growing environment and starts growing with more vigor than ever before.
Conclusion
Remember, transplanting is a delicate process that can directly affect your cannabis plant. Any mistake could slow down growth or, in the worst case, halt it entirely and cause you to lose your plant.
That is why it’s so important to fully understand the cannabis life cycle before attempting a transplant. Knowing when to transplant cannabis plants is key. Pay close attention to how your plants react to the change and always handle them gently, with as much patience and care as possible. Your cannabis plant will reward all your care and attention with generous, flavorful buds.
Sweet Seeds S.L. is not responsible for any misuse of the information provided in this article. Growing Cannabis may constitute a criminal offense or administrative infraction; please check the Cannabis legislation applicable in your place of residence. Sweet Seeds S.L. does not, under any circumstances, intend to promote illegal practices.

Deputy Director of the Content and Image Department at Sweet Seeds®.
Articles by Jaypp (see all)
- How to Use Bat Guano in Cannabis Cultivation - 25 de February de 2026
- Growing Marijuana Indoors with LED Lights - 26 de September de 2025
- Differences Between Cannabis Indica and Cannabis Sativa - 26 de September de 2025