
Cart
There are no more items in your cart



How to Make Compost at Home
Many times, you have probably wondered how to make compost at home and how to apply it to your cannabis plants. Well, in less than 20 minutes, we are going to teach you how to make compost for cannabis at home so you can achieve top-level results.
At Sweet Seeds®, we always advocate for the conscious use of resources and for the need to reduce the use of chemical fertilizers in crops, which is one of the pillars supporting sustainability.
Homemade compost is an organic fertilizer obtained through the controlled decomposition of organic materials, such as food scraps and garden waste, including leaves and stems from your plants. This natural recycling process is carried out by microorganisms and small invertebrates, which transform the waste into a nutrient-rich substance and make those nutrients available to the plants.
In short, compost is essential for sustainable agriculture that seeks not only productivity, but also the care and regeneration of the environment, while also providing us with top-quality flowers at a significantly lower cost.
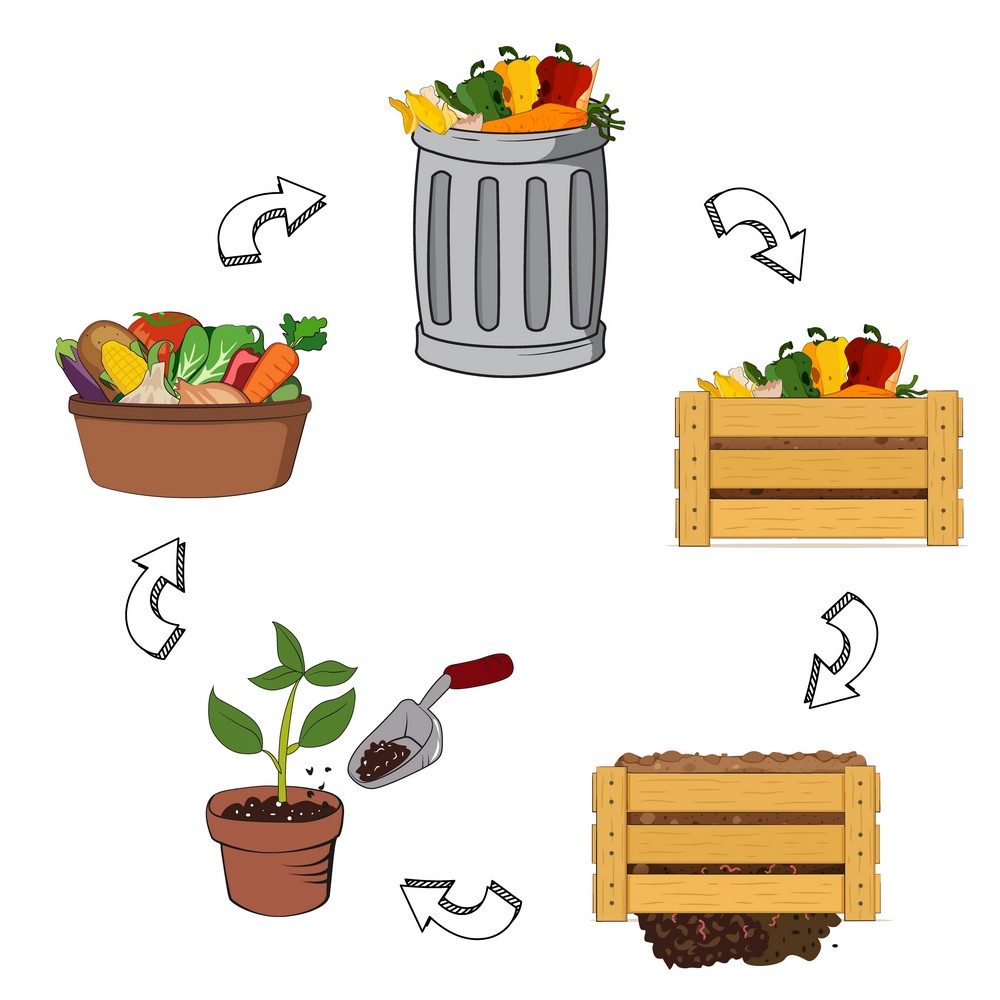
Benefits of Compost for Cannabis Growing
The importance of compost lies in its ability to improve soil structure, increasing its porosity and water retention capacity. This is vital for plant health, since well-structured soil allows water and nutrients to be accessed more efficiently.
In addition, compost provides a diversity of beneficial microorganisms that help suppress soil-borne diseases.
By integrating perfectly into the substrate, homemade compost acts like a sponge, retaining water and nutrients, which are then released slowly, making them fully available to the plants just when they need them. Imagine it as something like a refrigerator that refills itself and from which we can take food whenever we need it. Food in general, not just dessert.
In cannabis growing, the use of homemade compost reduces the need for chemical fertilizers and helps create greater protection in the plant against nutrient excesses, pests, and diseases, resulting in a final product of the highest quality.
In addition, this practice contributes to ecosystem conservation while also creating a recycling system.
Without a doubt, using compost for cannabis is a smart choice that will make your grow simpler, stronger, and more productive.
Essential Elements for Successful Composting
Well then, let us get to work and see what elements we need to prepare the best homemade compost for cannabis.
As a general rule, preparing DIY compost is simple and requires only a few elements. The main ones are green materials, fruit and vegetable scraps, pruning waste, tea bags, or coffee grounds, which provide nitrogen; brown materials, shredded dry leaves and branches, paper, and cardboard, which are richer in carbon; and a container where the composting process can take place.
In the next section, we are going to explain the whole process in detail and give you some great tips so your plants can benefit from the best homemade compost.
Step by Step: Creating Your Homemade Compost Pile
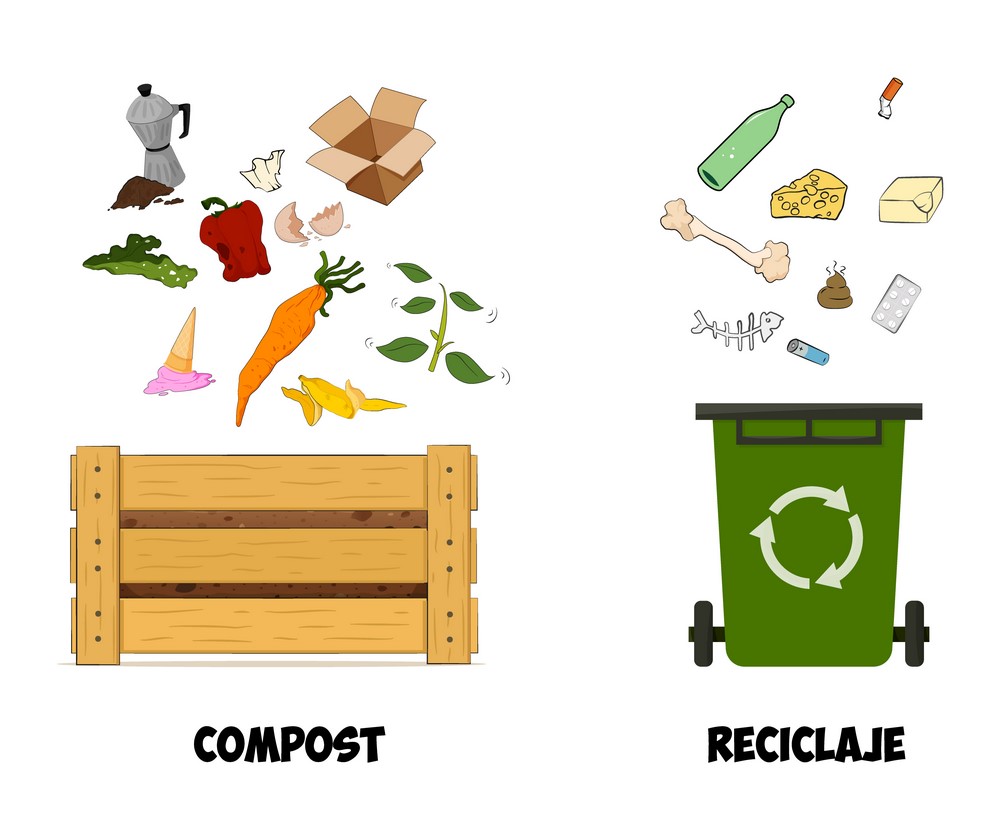
Now that you are starting to see clearly that you do not need to buy many things, we are going to move on to the practical part of how to make compost at home.
Take note and let us get into it.
Choosing the Ideal Spot for Your Homemade Compost
The first step is choosing the place where you are going to make compost. The success of the process will depend greatly on this.
- On the one hand, it is advisable to choose a place close to the garden or growing area and, if possible, also close to the kitchen. Remember that you will need to add pruning waste, food scraps, and some water. That way, you will have everything within easy reach.
- Choose a spot that is as level as possible for placing your compost bin, and make sure it has good drainage, because creating compost also generates liquid runoff. You can place it on a base that separates it from the ground to make collection easier.
- Place it in an area where it receives partial sun and is protected from the wind. If it gets too hot, it will dry out too much, and if it does not reach a high enough temperature, the process may slow down because it is too cold. Ideally, the inside should remain between 55 °C and 65 °C to speed up the process and eliminate pathogens and seeds that may have entered the pile.
Keep in mind that odors may be generated, so avoid placing it near windows or shared areas with neighbors.
Materials Needed to Get Started
The most important thing will be the composter or compost container where you are going to make your homemade compost for cannabis. You can build it yourself or buy one ready-made.
There are different sizes, and choosing the right one will depend on your needs and the space available. Some are also rotating composters, which are very helpful when it comes to turning the pile.
Then you will need the green and brown materials used to make the compost pile. We remind you that these will come from fruit and vegetable scraps, coffee grounds or tea, leaves, branches, paper, and cardboard.
You will also need something to turn it from time to time, so get a shovel or compost fork, as they will make the job much easier.
Finally, you can get a compost thermometer to monitor the internal temperature and make sure it stays within the optimal range.
Building the Base of Your Compost Pile
We already have the ingredient list and the materials. Now we are going to arrange them in the most efficient way possible:
- Prepare the base with branches or straw to help aerate it from the bottom and allow for better drainage, since it is not good for it to become waterlogged.
- Place the brown materials on top, dry leaves, shredded dry branches, and paper or cardboard, which will provide the carbon needed.
- Then it is time for the green materials.
Once you have it ready, cover it with plastic or with its lid to protect it from the rain and help it retain a good temperature and moisture level.
Adding Layers of Green and Brown Materials
After this first pile, you can keep adding more material as you gather greater quantities but always do it in the correct order. Alternate one layer of green material with one layer of brown material.
Following this order gives better results and a more even material mix when making DIY compost quickly.
Maintaining Proper Moisture and Aeration
Do not stop paying attention to the pile, and make sure it always maintains constant moisture. It should look like a wrung-out sponge, but not be waterlogged. If you notice it is too dry, you can add a little water. If, on the other hand, it is too wet, try leaving the lid open until it balances out and turn the pile to mix the wetter material with the drier parts.
You should also keep an eye on its aeration, which is why you will need to turn the pile from time to time, but we explain that in the next section.
How and When to Turn the Compost Pile
The main reason you should turn the pile from time to time is to provide oxygen to the mix, which is ideal for the aerobic decomposition of the materials.
In addition, the compost will become more uniform, and the moisture will be distributed more evenly. To do this, use the shovel and make sure that the drier materials on the edges are mixed with the wetter ones.
Ideally, you should do this at least every 2 to 4 weeks. We also recommend turning the mix when the temperature in the center of the pile drops below its optimal range, 55 °C to 65 °C. That way, you ensure healthy microbial activity.
If you notice a bad smell, it is a sign of a lack of oxygen, so you should turn it.
Monitoring the Progress of Your Compost
Achieving high-quality homemade compost rich in nutrients is simple as long as you keep an eye on its progress and make sure decomposition is happening properly. For that reason, follow these basic recommendations:
- As the process moves forward, the compost will take on a dark brown color and the texture will become uniform. Its initial volume will also decrease.
- It should smell like fresh soil. If it smells bad, that is a sign of a lack of oxygen.
- The compost should feel warm, around 65 °C. It should also feel moist to the touch, not soaked.
How to Know When Compost Is Ready
It is easy to know when it is ready to use on your cannabis plants. It should have a fine texture, with a certain fluffiness, and a dark brown color similar to forest soil. You should not be able to recognize the original material, and it should look fully decomposed.
Here we want to emphasize that the smell should be fresh, like damp earth.
At this point, your homemade compost is ready to use or store.
How to Make Homemade Compost in Small Spaces
For those who want to know how to compost at home in small spaces, there are a few workable options.
The simplest is to do it in plastic containers: make holes in the base and the sides. Chop the materials well and place the container, covered, in a spot where it will not be in the way. Do not forget to turn it and check it from time to time.
The other option is to use worms. To do this, use a box or container with a lid, make some holes in it, and close it with the lid. Add the food scraps, vermiculite, and the worms, preferably red wigglers. It is a slower process, but just as effective.
Using Compost in Your Cannabis Grow
Once your homemade compost is ready, you need to know how and when to apply it in cannabis growing.
First of all, homemade compost should be mixed with the substrate or soil you are using. For use in pots, the ideal option is to mix a portion of it into the substrate before filling the pot. You can use around 20% compost in relation to the total substrate. If you see that it is not enough and deficiencies appear, it is better to add more afterward.
If you apply it directly to the soil, a light layer of 2 to 5 cm is enough. Then mix it in so that it blends with at least the first 25 cm of soil.
Another widely used option, because it allows better dosing, is compost tea. You can make your own compost tea with this simple DIY compost recipe:
- Mix 1/4 of settled water with one third homemade compost.
- Let it steep for 3 or 4 days, stirring from time to time.
- To encourage the proliferation of aerobic microorganisms, it is recommended to aerate the mixture with an aquarium pump.
- After that time, strain the mixture.
- For watering, use the mixture at a ratio of 3 parts water to 1 part tea. If it is for foliar feeding, use a 4 to 1 ratio.
Another possible use is as a top dressing, applied directly to the surface without mixing it in. In addition to slowly providing nutrients, you will help eliminate weeds that may compete with your plant and retain more moisture.
Keep in mind that if it is for an outdoor grow, the ideal time to apply it would be at the beginning of the grow. You can also add it once you have harvested, in order to enrich the soil for the next crop.
This homemade compost is suitable for use with both autoflowering and photoperiod-dependent plants.
Common Problems and Solutions in Homemade Compost
The most common problems that may arise are:
- Bad odors or pests: it is important not to use meat, fish, oils, or dairy products, since they can attract pests and also create very bad smells. If the problem is not caused by this, it may be due to an excess of green material, in which case you should increase the amount of brown material, or to a lack of oxygen or excess moisture. In that case, turn the pile more often and adjust the moisture level.
- Uneven compost: caused by poor mixing or by pieces of material that are too large. The solution is to chop them into smaller pieces to help decomposition.
- Slow decomposition: caused by a lack of aeration, a temperature lower than recommended, or a lack of nitrogen. To solve it, turn the pile more often, increase the temperature by exposing the composter to the sun for longer, or cover it with a lid or plastic.
- Excess moisture: caused by rain or overwatering. To solve it, protect it from the rain and add more dry leaves or sawdust.
Conclusions and Best Practices for Healthy Compost
Well, now you have all the keys to how to make compost of very high quality, completely eco-friendly and sustainable, with which you will improve your grow, provided that you also have access to good genetics to put your homemade compost for cannabis to the test.
Visit our catalog and choose the strain that best suits your taste. At Sweet Seeds® we are convinced that our strains reach their best quality and expression with organic fertilizers, and if you prepare them yourself, the value doubles.
Thanks for reading, and happy composting!
Sweet Seeds S.L. is not responsible for any misuse of the information provided in this article. Growing Cannabis may constitute a criminal offense or administrative infraction; please check the Cannabis legislation applicable in your place of residence. Sweet Seeds S.L. does not, under any circumstances, intend to promote illegal practices.

Deputy Director of the Content and Image Department at Sweet Seeds®.
Articles by Jaypp (see all)
- How to Germinate Marijuana Seeds: Basic Guide - 8 de October de 2026
- How to Fertilize Your Cannabis Plants Easily - 16 de September de 2026
- CBD for Osteoarthritis: How Can It Help? - 16 de September de 2026